Stained glass lamps have been part of our decor since the mid 1800’s. They still fascinate us with all of their color and beauty. L.C. Tiffany Studio made stained glass lamps popular as early as 1848. One little known fact is that most of the stained glass lamp shades from Tiffany’s studio were made by women. One woman in particular, Clara Driscoll, was behind some of the most beautiful and beloved designs of the Tiffany lamps. Driscoll was the head of the Women’s Glass Cutting Department at Tiffany Studio from 1892-1909. Her Dragonfly lamp won a prize at the 1900 World’s Fair in Paris.
Owning a real Tiffany Lamp is every glass artist’s dream, but you can make your very own version of a “Tiffany” Stained Glass Lamp. “But how do I go about that?” you might ask. Start with deciding how big of a lamp you want to make as well as which design you want to tackle. I have made several “Tiffany” style lamps using the WordenSystem. It is very hobbyist friendly and uses foam molds to get the shape of your lamp. This unique way of lamp building allows you to do several designs on one form. The WordenSystem has over 200 lamp designs using 18 different forms.
Since the mid 1970’s H.L. Worden has become synonymous with brilliant stained glass lamp designs patterned after those by L.C. Tiffany. Howard Worden wanted to make lamp building easy for ordinary people who loved the craft. Working out of a mobile home, in a tiny town in Washington state, he developed the patented WordenSystem, using EPS Foam molds to build stained glass lampshades. Three years later, his retirement adventure turned into a world renown business in the stained glass industry. For more than 42 years, Howard’s idea brought delight to many hobbists that proudly display their very own stained glass lamp they had made, using the WordenSystem. In the Spring of 2015, sadly, Howard passed away. Like a rising Phoenix, The WordenSystem is back in production. It is a work in progress but will be readily available later this year. All of the Patterns and some of the forms are available now.
There are two types of Worden forms – Full Form and Sectional Forms. Both forms are similar in the preparation. Your pattern packet will include Color Key, Magic Strips, Pattern set and instructions. The Magic Strip will have row numbers that coordinate with the lines on the mold. Cut on the inside of the dotted line on the Magic Strips for each section of the lamp. I use flat head pins to pin the Magic Strips to the form. Be sure to leave the space of the horizontal mold lines between each row. The Flat head pins can be found at your local fabric store. You can also glue the Magic Strips to the form but that may cause a problem removing them to do another design. Carefully attach the Magic Strips, this will be your road map for your cut pieces of glass. The Magic Strips are not waterproof so be careful not to apply too much flux when you start to solder.
Now take your pattern sheet and cut on the outside of the line on each pattern piece. This will be your guide to cutting your glass for each piece. Your color key will have information that tells you how many pieces, how much glass you will need and what size vase cap it will require. It will also tell you how many times the design repeats. If it is a six repeat design, that means that you will cut 6 pieces of glass for each pattern piece. When deciding on glass for your lamp, keep in mind that there will be a light bulb behind your glass. If you pick a transparent glass, you may see the bulb. I would suggest holding the glass in front of a light bulb to get a better idea what it might look like with light behind it. Your color key will have the amount of glass needed, but it is just a suggestion. If you sometimes struggle with glass cutting, you may want to buy a little extra glass.
Time to get cutting! I take my pattern piece and trace around the pattern onto the glass with a marker. Cut on the inside of the marker line to get an accurate fit. There are so many ways to accomplish this goal, just do what works best for you. Be sure to write the pattern number on each piece of glass so you will know where to place them on the mold. After you have cut and ground your glass pieces, it is time to check the fit. Place the piece on the form, in the correct numbered location, to see how well it fits. It is easier to make adjustments before you foil. I recommend using 3/16” or 7/32” copper foil and wrap each piece of glass. Once this is done, it is time to assemble your new lamp.
Match the pieces of glass to the coordinating Magic Strip pattern on the form. I use glass head pins to hold the glass in place until I can tack solder them. I generally tack at the corners of the glass pieces, and work around the glass head pins. It is easy to accidentally tack the pins when you are soldering. Steer clear of those pesky pins. If you decide to tack as you go, use very little flux to preserve your pattern and your form for future lamps. If you need to stop working on your masterpiece for a bit, lightly spray with a neutralizer to get rid of the flux. Your lamp is in a fragile state so be careful handling it.
Once you have tack soldered your glass pieces in place, remove all of the pins that you used to hold the glass onto the form. I actually leave the bottom row of pins on the sectional form so that each panel will have the bottom row in the same spot. Leave the glass on the form and flat solder all of the exposed copper foil. This will add more strength to the lamp as you handle it and add the finishing touches. Don’t worry about the messy solder job at this stage. If you are building on a sectional form, be sure to clean and neutralize the flux before moving on to the next section. As you are soldering the panels, stop just shy of the side edges of the panels. This will the keep the solder from running over the edge and hinder the adjoining panel from fitting tight. When you are storing your completed panels, make sure they have needed support to keep their shape. I use a box with crumbled up newspaper to help support the panels until they are ready to assemble. Once you have completed all of the Sectional lamp panels, it is time to put them together. One idea is to make assembly loops with 2” of the solder, in a U shape, to temporarily hold the completed sections together. Assembly loops allow the positioning of the glass panels before they are permanently soldered together. Solder the ends of each loop to an outside horizontal seam so the solder loop will span between glass sections and temporarily hold them together. Place the loops at the bottom, top and about three or four inches apart in the middle. Before soldering the glass panels together, gently bend the solder loops using your fingers or pliers to move the panels to get a perfect fit. Check overall roundness to be sure the panels are where they need to be. Make sure your bottom is level. Any unevenness at the bottom will be very noticeable. Solder the sections together to add strength. You will then round up your solder seems after you get your sections secured.
It’s time to add the vase cap on the top of the lamp. I like to put 20 gauge wire along the top of the shade before you put on the vase cap. Be careful not to add too much solder on the top, while adding the wire. We want that vase cap to fit. If you are working with a Full Form Mold, leave your tacked glass lamp on the mold and place the vase cap on top. The cap should be touching the top row of glass. It is crucial to get the cap on straight and level. When you have the vase cap in position, add a small tack of solder on each side. Do one more check to see if the vase cap looks level then tack solder at each foil line intersecting with the cap. The vase cap will carry most of the weight of the lamp onto your lamp base. It is critical that you get a good solder attachment on the vase cap. If you are using a heavy cast brass cap, it will require more heat to get a good attachment. If the solder looks lumpy, simply apply more heat. Be careful not to overheat the glass, that could cause a crack in the glass. Now, it is time to do finishing soldering. If you are building on a full form mold, remove the lamp from your form first.
Carefully build up the solder on the inside as well as the outside of the lamp to add more strength. As you know, when you solder a vertical surface, the solder will run down the lamp and into your lap. Try to get your lamp level enough to run your solder bead, just be careful not to let the weight of the lamp cause stress on your fragile lamp as you are soldering.
One final step, I also like to add 20 gauge wire along the bottom edge of the lamp and embed it into the soldered edge. This will give you more strength and support to your stained glass lamp. Once you finish soldering, you will need to wash and neutralize your new family heirloom. You may wish to add black patina to enhance the look of your lamp. If you decide to use black patina, the cap can also be darkened. Resist the urge to black patina your cap before you solder it onto your lamp. Once you patina the cap, it is extremely difficult to add solder. The cap can be stubborn at times so you may need to apply the patina on the cap several times to get a good finish. The vase cap may have oil residue that can cause areas on the cap from taking patina. You may want to clean the oil off first before you start the patina. Sometimes with a stubborn spot, I use a Scotch Brite pad, careful not to scratch the glass, and go over the cap. Then apply the patina again. Once you have finished with the patina, you will also need to neutralize once again. My secret to a shiny black patina is to use Pledge Polish over all of the lamp and wipe with a soft cloth. Lemon flavor smells nice too!
The proud moment comes when your friends and neighbors are amazed that this beautiful stained glass lamp was made with love by you! It is truly a labor of love but will be cherished for generations.
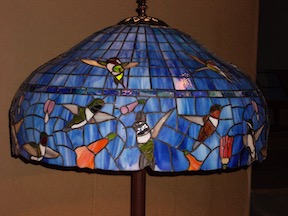
Marilyn Trebacz
wordenlamps.com